|
|
| TRAVEL PHOTOGRAPHY DIGEST |
 |
Any Light Can Be The Right Light
Text and Photos by Judith Pishnery, November, 2004
Shoot All Day Long
Most people (myself included) don’t have the time or patience to stay
in one place all day. I love to explore as much territory as possible when I
travel—or for that matter, when I shoot locally—which means that
I will visit some locations at midday. The conditions could be overcast, the
subject may not be in the “ideal” light, but I have approached each
photograph with the idea that I can make a unique, interesting image with what
I have.
Having plenty of time to explore each location thoroughly in all types of light
at different times of the year would be ideal, but not realistic. You’ll
have a limited amount of time and perhaps only one chance to make that photograph,
so make the best of it. You may be surprised—it may not look like a postcard
(you can buy one), but it will be your unique image.
|
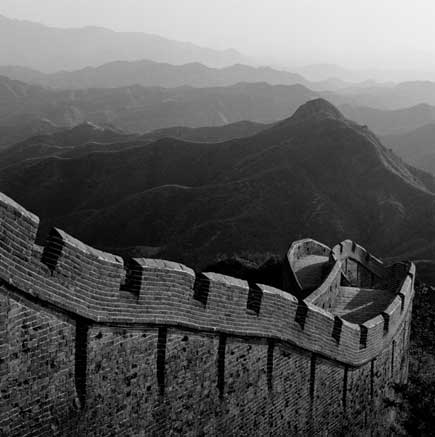
By shooting in black-and-white and concentrating on details, Pishnery
got some great shots of the Great Wall of China.
|
|
My trip to China sets an example
for less than ideal lighting conditions. While in Beijing during the early summer,
I shot many rolls of color film at all times of the day and some at night. Night
offers many opportunities for artificial light to make an otherwise dull scene
come to life. (See Judith Pishnery’s story entitled Jewels in the Night,
in the May 2004 issue of Photographic). In China, the light was imperfectly
perfect. Although sunny, the sky appeared somewhat hazy and overcast, with the
light being softly filtered by the summer smog, created from coal-generated
power and dust blown in from the Gobi desert.
Normally high-contrast midday summer light was softly filtered (through the
smog) and created great lighting conditions all day long, as long as I didn’t
include too much of the sky. A polarizing filter and an 81B warming filter improved
the overall appearance of my photos, reducing summer glare and adding some warm
color to the light. I was able to adjust for this by having some film processed
while I was in Beijing, just to see how it looked. For any trip or project,
I highly recommend having some of your film processed wherever you are. It’s
a good way to review your progress and make any corrections or adjustments to
film, camera techniques, exposure, subjects, etc.
|
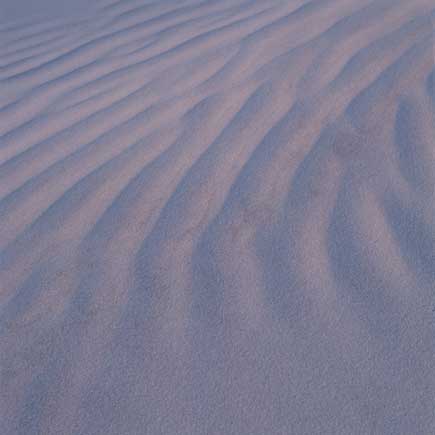
You can take pictures of details on a sunny day, no matter what
time it is. Just study how the light strikes your subject.
|
|
During the same China trip, I ended
up at the Great Wall after lunch. My first thought while looking over the terrain—the
dusty grayish brown colors of the stone wall, the trees and dirt seemingly running
together, and blanketed in a dreadful, hazy, midday summer sky—was that
of despair. It wasn’t my first choice for lighting conditions, but it’s
what I was faced with. Fortunately, I had lots of black-and-white Tri-X film
and a red filter. By minimizing the amount of sky and concentrating on the details
and angles of the wall, I came away with amazing photographs. I am not disillusioned
with the midday light in the middle of the summer; I view it as another perfect
light situation.
Various Types of Light
Several trips to Cumberland Island, Georgia, provided ample opportunity to take
advantage of many types of light, all different, and all beautiful. Staying
at the inn on the island made it easy to take advantage of dawn and dusk lighting.
Forcing myself out of bed each morning, hours before breakfast, and dressing
warm to ward off the cold January air, our small group of photographers made
our way to the beach. We walked on sandy paths covered by a canopy of live oaks
draped in Spanish moss, only to be rewarded with pristine, deserted beaches
just beginning to awaken under the soft blue light of dawn. With only six photographers
on the beach and no one else in sight, it was glorious.
One cloudy morning provided soft blue and pink tones in the sky and across the
dunes, another offered up crisp sunlight raking the textures of the plants,
beach and dunes with rich golden tones. In the early morning and late afternoon,
the low angle of the sun creates wonderful shadows, and the sidelight gives
dimension to subjects. Look for viewpoints that include the lighted and shadow
sides of the subject—this greatly enhances three-dimensionality.
|
Early morning light rakes across the sand at Cumberland, Island,
Georgia.
|
|
Cumberland Island is a National
Seashore and is protected from development. The daily visitor rate is limited,
ensuring a tranquil setting for the wild horses, deer, bobcat, boar, armadillos,
and birds, along with beautiful landscape opportunities.
One of the key items in finding the perfect light is being aware of all types
of light, evaluating its qualities, its color, and determining the best way
to work with it. Being prepared for a variety of situations is helpful. I always
take several types of film (color and black-and-white) and several favorite
filters to make the best of each location. I look at the weather reports when
traveling and make some key decisions on film and gear based on that info (keeping
in mind that the weather will probably change during the day, and I bring some
rain gear).
I have learned that any light can be the perfect light—it’s how
you choose to photograph your subject. If you go out to create images without
any preconceived idea and respond to the subject, the moment and the light,
you will create images unique to you and to that moment, not a copy of anything
else. So get ready: Don’t wait, shoot now, and don’t go back (unless
you want to). The light will be perfect.
“Sometimes I do get to places just when God’s ready to have somebody
click the shutter.”—Ansel Adams
Some of My Favorite Filters
• Polarizing filter (B/W or Color): Great for eliminating glare and saturating
color. Think of a polarizer as
sunglasses for your camera.
 • Warming filter (81A or 81B, -Color): This filter is great for adding
a little warmth to the image. Warms up skin tones and warms up the cool tones
of light on an overcast day or cool tones in the shade.
• Warming filter (81A or 81B, -Color): This filter is great for adding
a little warmth to the image. Warms up skin tones and warms up the cool tones
of light on an overcast day or cool tones in the shade.
• Yellow, Orange and Red filters (B/W): Ideal for adjusting the contrast
in a scene when shooting in black-and-white. I use a Yellow #12 filter for nearly
all black-and-white photography, but when I want more contrast, I use an orange
filter and for even greater contrast, I use a red one. What the filters actually
do is lighten the warm tones (yellows, oranges, reds) and darken the cool tones
(blues, cool greens) and add contrast this way. Yellow is great for brightening
skin tones and darkening the blue sky a bit, while orange creates a more-noticeable
effect, and red produces very dramatic results.
Main Page >>>>
About the Author
Judith Pishnery creates imaginative photographs that capture the beauty, mystery and splendor of many locations throughout the U.S. and abroad.
Official Website: Judith Pishnery
Other Articles: Photographic.com
More travel Photography Tips >>>>
|
|
Want this Ad Space?
|
|
Make
LAKBAY PILIPINAS your Homepage
|
| |
|